Sunday, January 29, 2012
Thursday, January 26, 2012
Tuesday, January 24, 2012
Creating a Case...

 So one of my next patterns is definitely going to be this one! lol... I made this to fit a Pandigital Nova (I got mine at Best Buy lol) however it can be altered to fit other common eReader brands, and new sizes will definitely be coming out soon!
 I really enjoyed making this one and gave it to my friend who happens to have the exact same eReader as I do (she totally saw it and had it first!) and she absolutely LOVES it... Funny she helped me pick out what stitch pattern to use in creating this one... hmmmm... lol
So let me know what you think... And what other eReaders or tablets you think I should do next!
Happy Crafting!
<3
Teri
Saturday, January 21, 2012
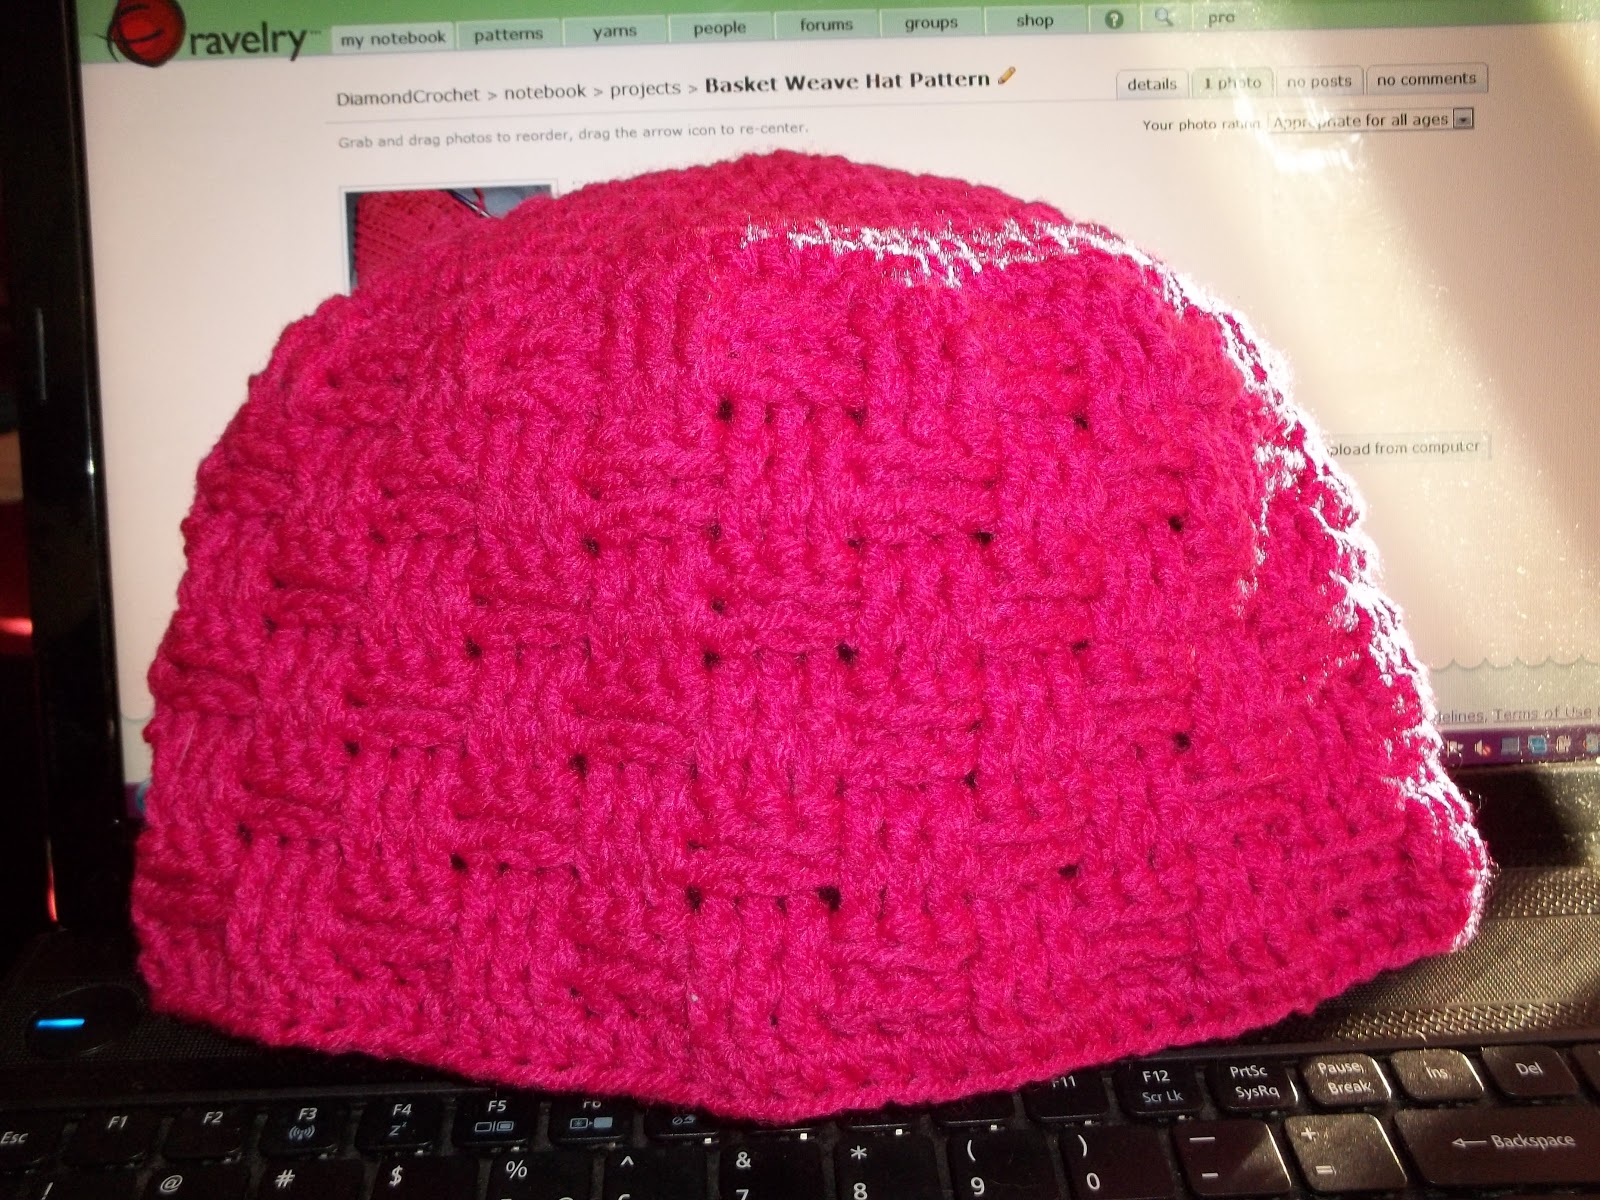
Basket Weave Hat Pattern
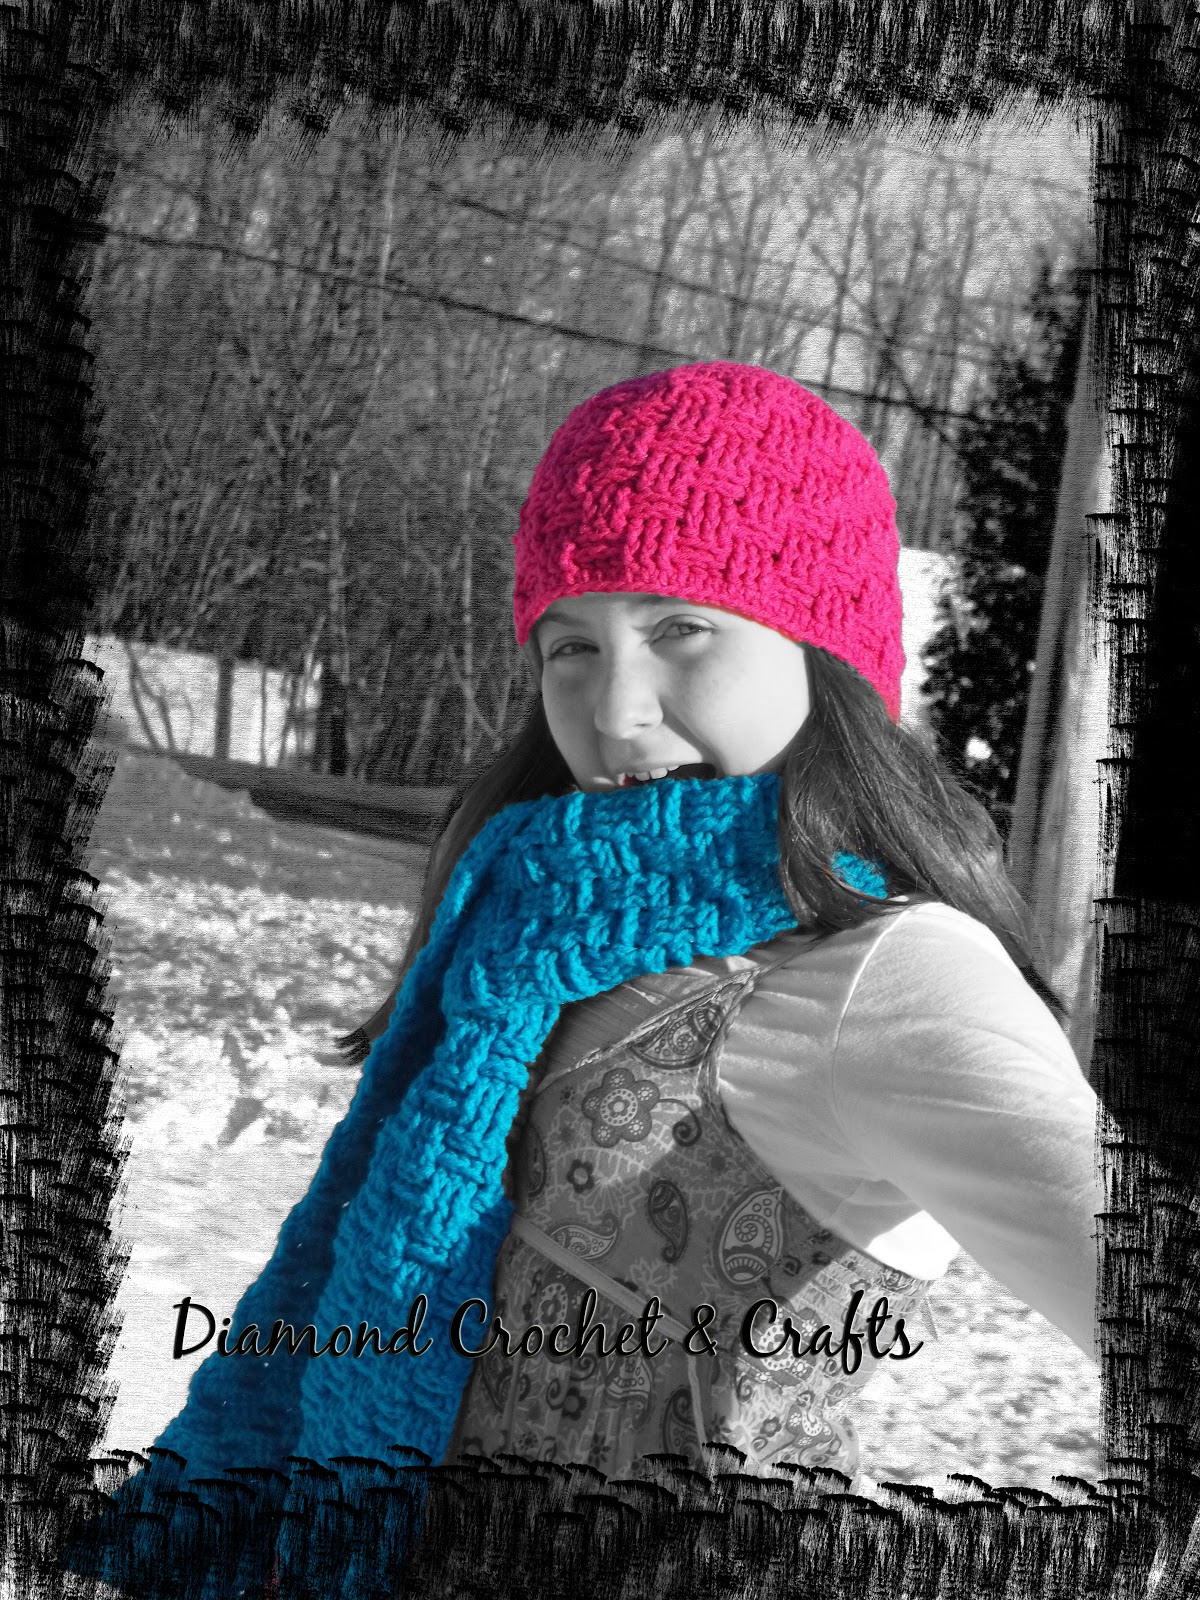
By: Teri Diamond for Diamond Crochet & Crafts ©
2012
 |
Abbreviations
Used:
CH – Chain
FPDC – Front Post Double Crochet
BPDC – Back Post Double Crochet
HDC – Half Double Crochet
SL ST – Slip Stitch
ST – Stitch
Tutorials available at www.diamond-crafts.com/crochet_tutorials.htm
|
Materials
Needed:
Worsted Weight
Yarn – I used Red Heart Super Saver for the sample
H Hook
Yarn Needle
Size: Adult
Gauge:
N/A
(not gathered just yet)
|
Notes:
You will be
alternating in a pattern of 3 front post double crochet and then 3 back post
double crochet for two rows and then you will reverse it and do 3 back post
double crochet and then 3 front post double crochet.
|
|
Special Stitch Instruction:
BPDC
– Yo, insert hook around the post of the stitch below from the BACK side, yo,
pull through and complete as a regular double crochet stitch.
FPDC
- Yo, insert hook around the post of the stitch below from the FRONT side, yo,
pull through and complete as a regular double crochet stitch.
Directions:
Ch 4,
sl st into 1st ch.
{This part of the hat is worked in rounds,
continue in that manner until it is specified not to. It will change when you
start to do the Basket Weave stitches.}
Rnd 1 – Hdc 8 times in ch
4 circle. (8 hdc) {Place a marker to show where the round will end}
Rnd 2 –
2 hdc
in each st around to marker, place marker (16 hdc)
Rnd 3 – Hdc
in 1st st, *2 hdc in next st, hdc in next st* repeat to st before
marker, 2 hdc in last st, place marker. (24 hdc)
Rnd 4 – Hdc in 1st two st, *2 hdc in
next st, hdc in next 2 st* repeat to st before marker, 2 hdc in last st, place
marker. (32 hdc)
Rnd 5 –
Hdc
in 1st three st, *2 hdc in next st, hdc in next 3 st* repeat to st
before marker, 2 hdc in last st, place marker. (40 hdc)
 |
| After Row 16. |
Rnd 6 –
Hdc
in 1st four st, *2 hdc in next st, hdc in next 4 st* repeat to st
before marker, 2 hdc in last st, place marker. (48 hdc)
Rnd 7
- Hdc
in 1st five st, *2 hdc in next st, hdc in next 5 st* repeat to st
before marker, 2 hdc in last st, place marker. (56 hdc)
Rnd 8
- Hdc
in 1st six st, *2 hdc in next st, hdc in next 6 st* repeat to st
before marker, 2 hdc in last st, place marker. (64 hdc)
Rnd 9
- Hdc
in 1st seven st, *2 hdc in next st, hdc in next 7 st* repeat to st
before marker, 2 hdc in last st, place marker. (72 hdc) sl st in 1st
st after marker, ch 2.
{This is where you will STOP working in
rounds without sl st, to start you will sl st in the 1st st after
the marker, you will do this for the rest of the pattern.}
Rnd 10
– *fpdc
in 3 st {this includes the st that you sl st into at the beginning}, bpdc in
next 3 st* repeat around, sl st into 1st st {This would be the 1st
fpdc NOT the ch 2. Ch 2 does NOT count as a st in this pattern} Ch 2 (72 st)
 |
| Shows the top rounds, body rounds, and trim round. |
Rnd 11
– Repeat
Rnd 10
Rnd 12
- *bpdc
in 3 st, fpdc in next 3 st* repeat around, sl st into 1st st. Ch 2 (72 st)
Rnd 13
– Repeat
Rnd 12
Repeat
Rounds 10 through 13 three more times. You
will have a total of 23 Rounds.
Rnd 24
– Hdc
in each st around, sl st into beginning st, tie off and weave in ends.
www.diamond-crafts.com
Friday, January 20, 2012
Writing MORE Patterns!!
Soooo... Apparently Saturday is the designated day for FREE CROCHET PATTERNS to hit the blog! ;)
I am working on putting the marvelous Basket Weave Hat Pattern into blogable format so that you guys get it tomorrow! <3
I have to say I really am enjoying making new patterns almost as much as I enjoy crocheting itself! I am working on crocheting a Basket Weave E-Reader Case for my Pandigital Nova, but I am also going to add for the Kindle Fire and IPad2! That should be ready to go NEXT WEEK!!
I hope you enjoy getting a free shot at our patterns BEFORE they hit the sales rack! Just remember that if you contact me I can always send you a full color print copy via snail mail for an additional $1.50! I am almost like Burger King... Giving it to you, your way... haha well ALMOST your way! lol
Anyhow I hope that you are all enjoying the weather where you are! This is what it looks like from my laptop camera looking out my front living room window!
Snow, snow, snow... In every direction you look, every where you go! LOTS OF SNOW!! Oh and in the forecast: Three MORE minor snow storms this upcoming week - they start TOMORROW!!! You know three minor totally equals at least one and a half majors, right?!? Because I totally know that one!!
Anyhow... Until Tomorrow!
Happy Crafting!
<3
Teri
I am working on putting the marvelous Basket Weave Hat Pattern into blogable format so that you guys get it tomorrow! <3
I have to say I really am enjoying making new patterns almost as much as I enjoy crocheting itself! I am working on crocheting a Basket Weave E-Reader Case for my Pandigital Nova, but I am also going to add for the Kindle Fire and IPad2! That should be ready to go NEXT WEEK!!
I hope you enjoy getting a free shot at our patterns BEFORE they hit the sales rack! Just remember that if you contact me I can always send you a full color print copy via snail mail for an additional $1.50! I am almost like Burger King... Giving it to you, your way... haha well ALMOST your way! lol
Anyhow I hope that you are all enjoying the weather where you are! This is what it looks like from my laptop camera looking out my front living room window!
 |
| SNOW SNOW SNOW... Oh yeah and my plants! |
Snow, snow, snow... In every direction you look, every where you go! LOTS OF SNOW!! Oh and in the forecast: Three MORE minor snow storms this upcoming week - they start TOMORROW!!! You know three minor totally equals at least one and a half majors, right?!? Because I totally know that one!!
Anyhow... Until Tomorrow!
Happy Crafting!
<3
Teri
Sunday, January 15, 2012
Patterns Listed Free 100 Views ;)
We have decided that every new pattern that we put out for sale we are going to have you all preview on our blog for FREE for up to 100 VIEWS!!
We figure that this is a great way to show you what we do and for us to learn what you like!
Let us know what you think of this idea... After 100 views you can purchase them on our store (cheapest), on etsy (cheaper) or on ravelry (not so cheap) in pdf or print at any time! <3
We figure that this is a great way to show you what we do and for us to learn what you like!
Let us know what you think of this idea... After 100 views you can purchase them on our store (cheapest), on etsy (cheaper) or on ravelry (not so cheap) in pdf or print at any time! <3
Pinterest... New Addiction?!?
So... I have been introduced to this new website called Pinterest... As if the name is not interesting enough... I have been on there for a couple of days and am COMPLETELY HOOKED!! lol... It is the absolute neatest thing in the entire world! I love how it allows you to take pictures from just about anywhere and share them...
It is almost like a social network of just pictures with little comments and links ;) I think it is a great way for crafters to show off their work and even to locate some new inspiration! When you "pin" something (I am so addicted that I have a "Pin It" button on my Chrome toolbar and can pin freely!) it appears under your "Board" and you share it with others, they can "Repin" if they like the item and then it will be shared with their friends as well... And on and on your pin tumbles! ;)
Freakin Awesome!
I have been posting the stuff that I have listed on Ravelry and some from Etsy... The only down side that I have seen is that you CANNOT pin from facebook... Sadly that is where most of my pictures are located! lol
Guess I have to work up a gallery on here, or maybe just finish the one that I started on my web page! haha
Anyhow off to check on my pins... You can check them out too... Just click HERE!
<3 Happy Crafting on this COOOLLLLDDD day in New England!
Teri
Saturday, January 14, 2012
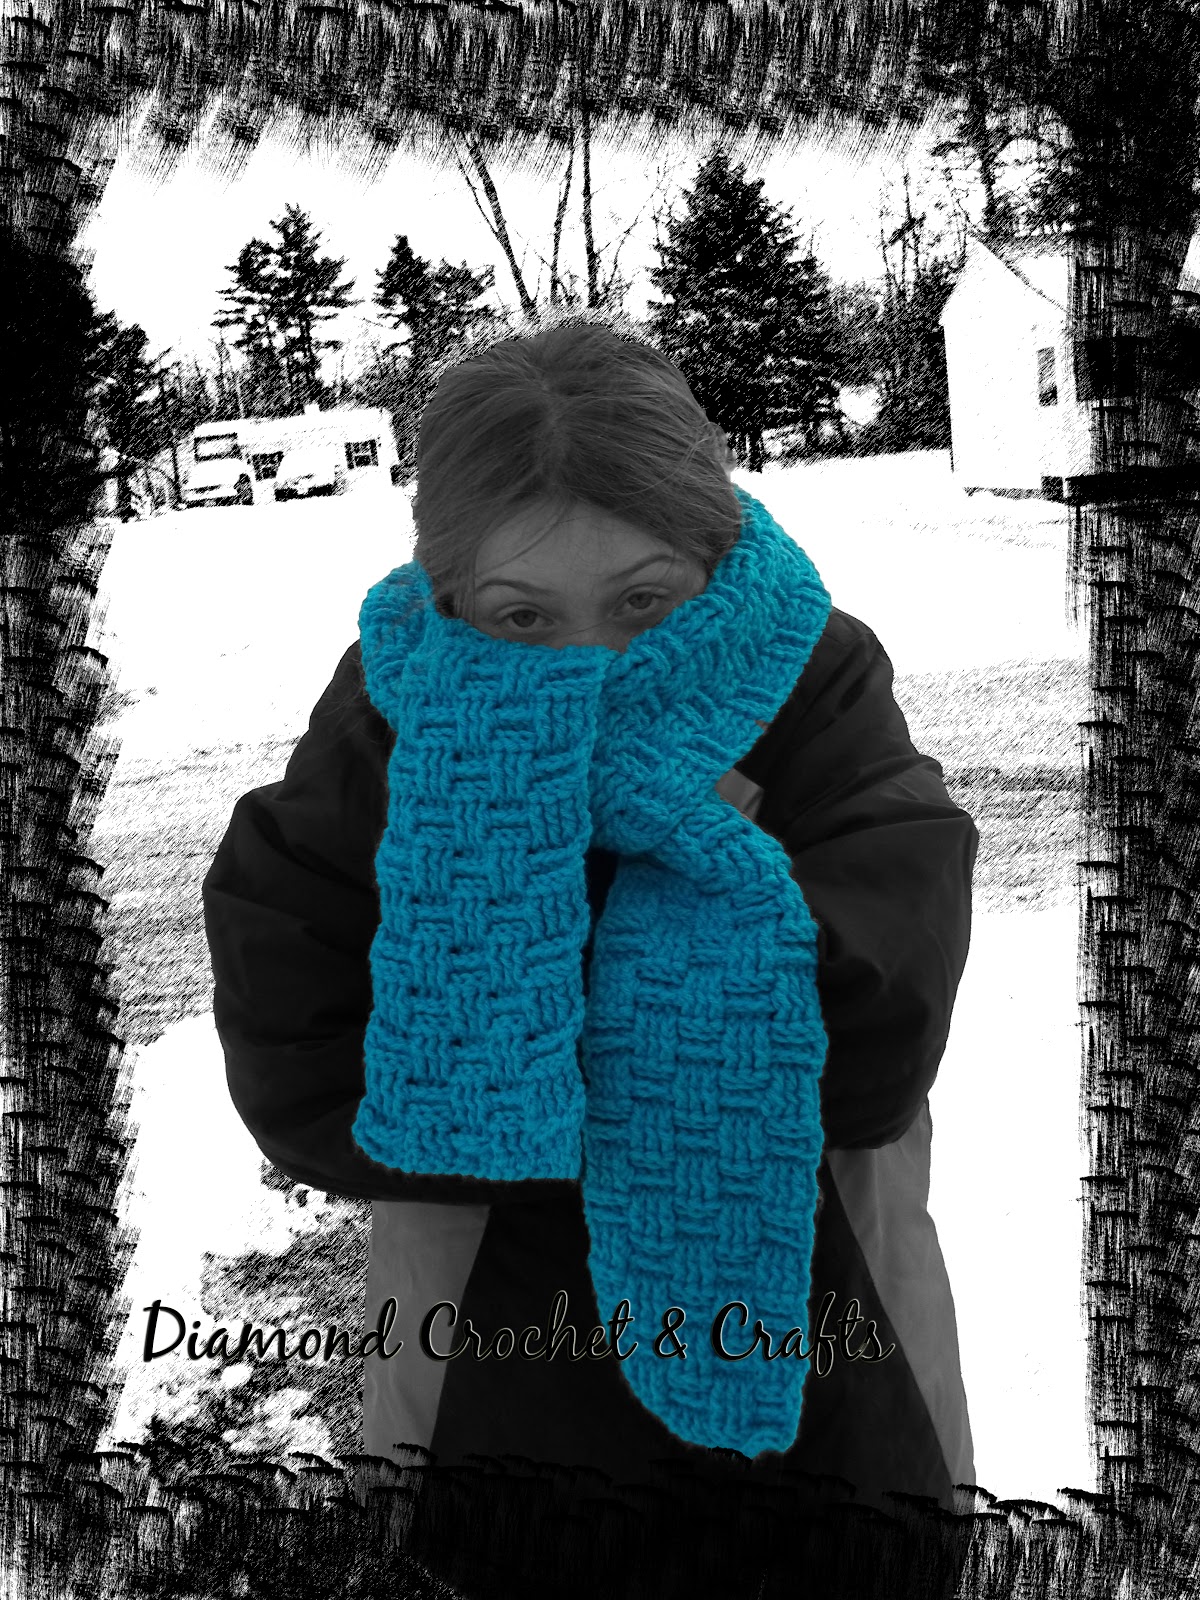
Basket Weave Scarf Pattern
By: Teri Diamond for Diamond Crochet & Crafts ©
2012
Abbreviations
Used:
CH
– Chain
DC
– Double Crochet
FDC
– Foundation Double Crochet
FPDC
– Front Post Double Crochet
BPDC
– Back Post Double Crochet
ST – Stitch
Tutorials available at www.diamond-crafts.com/crochet_tutorials.htm
|
Materials
Needed:
Worsted Weight
Yarn – I used Red Heart Super Saver for the sample
K Hook (5.5)
Yarn Needle
Size: 75” Long &
Approx 6.5” Wide
Gauge:
No
real gauge necessary
Sample - 1 Block = approx. 1 1/4”
|
Notes:
*You will be
alternating in a pattern of 3 front post double crochet and then 3 back post
double crochet for two rows and then you will reverse it and do 3 back post
double crochet and then 3 front post double crochet.
*If you would
like your completed project to be wider you would simply add onto your
foundation row in multiples of three (3).
|
|
Special
Stitch Instruction:
*BPDC
– Yo, insert hook around the post of the stitch below from the BACK side, yo,
pull through and complete as a regular double crochet stitch.
*FPDC
- Yo, insert hook around the post of the stitch below from the FRONT side, yo,
pull through and complete as a regular double crochet stitch.
*Beginning
FDC – (Foundation Double Crochet) – Ch 3, yo, insert hook in 1st ch,
yo, pull through, ch 1, pull through first two loops, yo, pull through
remaining 2 loops on hook.
*FDC
– (Foundation Double Crochet) – yo, insert hook into the ch 1 space in the
Beginning FDC, yo, pull through, ch 1, yo, pull through first loops, yo, pull
through the remaining 2 loops on hook.
Directions:
 |
| After Row 5 Completion |
Row 1 – Beginning fdc
followed by 16 fdc for a total of 17 st. Ch 2, turn.
Row 2 & 3 – Fpdc in 2nd st from hook and in
next 2 st, *bpdc in next 3 st, fpdc in next 3 st, repeat from * to * to the
end, hdc in last st of the row. Ch 2, turn.
 |
| A view of the Body |
Row 4
& 5 – Bpcd
in 2nd st from hook and in next 2 st, *fpdc in next 3 st, bpdc in
next 3 st* repeat from * to * to the end, hdc in last st of the row. Ch 2,
turn.
Repeat
rows 2 through 5 to the end of the scarf.
{Sample uses 139 Rows to complete scarf}
Wednesday, January 11, 2012
3-6 Month Sack Hat with Pom-Pom Crochet Pattern
Get other sizes in pdf format on Ravelry now!
Pattern By: Teri Diamond for Diamond Crochet & Crafts © 2011

Abbreviations Used:
Rnd 2 - *fpdc on next st,
bpdc on next st* repeat from * to * around, fpdc on the last st., sl st in top
of ch 2 st, ch 2, do not turn.
Rnd 3 – Repeat round 2
{Ch 2 no longer counts as 1st stich;
this creates fewer gaps in the hat body}
I am not a huge fan
of large and extremely full pom-poms, I prefer the floppy pom-poms, you may use
whatever type of pom-pom you are comfortable with. I use a 3x 5 index card to make most of my
pom-poms, for these I used the longer side.
I wrapped the yarn around approximately 30 times (30 rounds) and then I
clipped a string of matching yarn, pulled my neat little circle off of my index
card and tied a simple knot around the center, once the knot is tight and the
pieces are secure I cut the loops and hold them to trim for even pom-poms. I then pull the strings of the knot through
the top corners and tie them off on the inside and weave the ends in on the
inside of the hat.
- Baby Large (6-12 Month)
- Baby Small (0-3 Months)
- Toddler Size (18 Month - 5t)
- ALL 5 Sizes for a SAVINGS! - Includes *NEW* Preemie size!!
Pattern By: Teri Diamond for Diamond Crochet & Crafts © 2011

CH – Chain
DC – Double Crochet
FDC – Foundation Double Crochet
FPDC – Front Post Double Crochet
BPDC – Back Post Double Crochet
SL ST – Slip Stitch
YO – Yarn Over
ST – Stitch
Tutorials available at our website
Materials Needed:
Worsted Weight Yarn – I used Red Heart Super Saver for the sample
I Hook (5.5)
Yarn Needle
Size: 15 - 17”
Baby – Medium (approximately 3-6 month size)
Gauge: 10 dc = 3 inches
Notes:
Hat is worked from the brim to the top
Special
Stitch Instruction:
*BPDC
– Yo, insert hook around the post of the stitch below from the BACK side, yo,
pull through and complete as a regular double crochet stitch.
*FPDC
- Yo, insert hook around the post of the stitch below from the FRONT side, yo,
pull through and complete as a regular double crochet stitch.
*Beginning
FDC – (Foundation Double Crochet) – Ch 3, yo, insert hook in 1st ch,
yo, pull through, ch 1, pull through first two loops, yo, pull through
remaining 2 loops on hook.
*FDC
– (Foundation Double Crochet) – yo, insert hook into the ch 1 space in the
Beginning FDC, yo, pull through, ch 1, yo, pull through first loops, yo, pull
through the remaining 2 loops on hook.
Directions:
Beginning round is created using the FDC
stitches, this allows for more stretch than the conventional chain and double
crochet beginning.
 |
| End round 1. |
Rnd 1 – Using the above instructions make one
beginning fdc stitch and 47 fdc stitches.
You will need to have a total of 48 stitches. Sl st into the top ch of the beg ch 3, ch 2,
do not turn.
{There will be a gap
on the bottom when you connect, you will take the beginning tail and attach and
weave in at the end}
 |
| Beginning round 2. |
 |
| End round 2. |
 |
| Completed brim - After the first 3 rounds. |
Rnds
4- 10
– Dc in same st as sl st, dc in each st around, sl st to 1st dc {Not
CH}, ch 2, do not turn.
 |
| Beginning of Round 4. |
Rnd 11 - Dc in same st as
sl st, dc in each st around, sl st to 1st dc {Not CH}, ch 1.
 |
| The beginning of the closing row. |
Closing Row – Hold hat flat {You will be working
through two stitches at the same time while closing the top} sl st across. Tie off.
Weave in ends.
Pom-Poms: *You can check out my tutorial HERE*
 |
| The end of the closing row. |
Don’t
forget to close that gap on the first row and weave the end in as well!
We have other sizes of this particular pattern available at Ravelry and on our facebook page. We offer them in PDF and in print mailed to you!
Enjoy!
We have other sizes of this particular pattern available at Ravelry and on our facebook page. We offer them in PDF and in print mailed to you!
Enjoy!
www.diamond-crafts.com
Sunday, January 8, 2012
Diagonal Scarf Crochet Pattern
By: Teri Diamond for Diamond Crochet & Crafts ©
2012
 |
| Completed Scarf & My Amazing Photography Skills ;) |
Abbreviations
Used:
CH – Chain
DC – Double Crochet
SC – Single Crochet
SL ST – Slip Stitch
SP – Space
ST – Stitch
Tutorials available at www.diamond-crafts.com/crochet_tutorials.htm
|
Materials
Needed:
Worsted Weight
Yarn – I used Red Heart Super Saver for the sample
K Hook (5.5)
Yarn Needle
Size: 75” Long &
Approx 6.5” Wide
Gauge:
No
real gauge necessary
Sample - 1 Block = approx. 1 1/4”
|
Notes:
*Scarf is worked
in a diagonal row
*You are building
up in “blocks” and as long as you are increasing in width and length you
should have a # of blocks that is equal to the # of the row that you are on,
example: on row 3 you would have 3 blocks, on row 4 there would be 4 blocks.
* You will NOT turn at the end of the row unless
otherwise specified, you will actually let the piece turn itself by following
the pattern.
|
|
 |
| End of Row 1 |
Directions:
Ch 6
Row 1 – Dc in 4th
ch from hook and in 2 remaining ch sp. Ch 6.
 |
| Creating Block 2 in Row 2 |
Row 2
- Dc in 4th ch from hook and in 2
remaining ch sp, sl
st into ch 3 sp from previous row (in the dc made by the ch 3, not in the
individual ch), ch 3, 3 dc in same ch3 sp as sl st (on previous row) ch 6.
 |
| End of Row 3 |
Row 3 - Dc in 4th
ch from hook and in 2 remaining ch st, *sl st into ch 3 sp from previous row,
ch 3, 3 dc in same ch3 sp as sl st* repeat from * to * to the end of the row.
ch 6.
Rows 4-6 – Repeat row 3
 |
| After the first 6 rows |
 |
| Shows End of Row 7, before Ch 3 |
Row 7 – Dc in 4th ch from hook & 2
remaining ch st *sl st in 3 ch sp from previous row, ch 3, 3 dc in same 3 ch sp
as sl st* repeat from * to * until you have 1 block remaining. Ch 1, turn,
sl st in each of the 3 dc you just made and in ch 3 sp. Ch 3
Row 8
- *3
dc in ch 3 sp below, sl st into next ch 3 sp, ch 3* repeat from * to * to the
end, ch 6.
Rows 9
– 73 – Repeat
alternating Rows 7 & 8, end after a row 7 repeat
{If you would like
your scarf to be longer or shorter you would simply increase or decrease the #
of rows that you insert in the body. You MUST
end after completing a repeat of Row 7.}
 |
| Shows Decreasing After Row 74 |
 |
| Row 76 |
Rows 75 – 79 - Repeat Row 74. Do NOT
ch 3 at the end of Row 79. Fasten off and weave in ends.
Optional
Edging:
 |
| Close-Up of the edging Including the corners. |
Attach to any block
on the top of the 3dc block * 2 sc evenly in 3 dc block, 4 dc in next block
(should be side of dc or 3 ch sp)* repeat from * to * around using 6 dc instead
of 4 dc on corner sp. Fasten off and
weave in ends.
Enjoy! We would love to see what you have made! You can post your pictures on OUR FACEBOOK PAGE!
<3 Teri
www.diamond-crafts.com
Sunday, January 1, 2012
Pom-Pom Tutorial
So I am not a big fan of extremely full pom-poms... I am also not a big fan of spending a ton of time on adornments for a project! I LOVE things that work up fast and show me progress really early in the project so for me an easy pom-pom is exactly what I am looking for!
Here is how I do them...
Voila! You have a happy floppy pom-pom!!
<3 We will be posting more tutorials soon!
Teri
Here is how I do them...
 |
| Start out with a corner or place that you would like to put your pom-pom |
 |
| I take a regular 3x5" index card. I usually stack 5 or so of them so that it does not bend as easily! |
 |
| I generally wrap it around about 30 times, I try to make them exact but that does not always work out so well! I do not know about you but I am NOT counting after this point! |
 |
| After you trim the piece you are wrapping, cut a piece of the same yarn that is about 8-10 inches long... Set this piece in the center underneath the wound up yarn. |
 |
| Make a tight and secure knot around the center. |
 |
| Fold the pom-pom in half with the knotted end in your hand. |
 |
| Clip through all of the looped ends, I usually stick the scissors in one end and cut one half of the pom-pom at once. |
 |
| Hold the knotted end in your hand again, this time a little closer to the cut ends and trim so that the ends are close to even, there is no reason to make sure that they are exact. |
 |
| Tie your pom-pom to your project and weave in the extra ends. I make sure that all of this is done on the inside so no one else has to see it! |
<3 We will be posting more tutorials soon!
Teri
First pattern is DONE!!!
I did it!! My very first pattern has been written, tested, edited, and is now DONE and ready to go!! I have totally completed the toddler size and am ALMOST done with the baby size!
I have also been working on our website... It is a work in progress!! I am planning on doing a few more tutorials over the next few days too!

I have also been working on our website... It is a work in progress!! I am planning on doing a few more tutorials over the next few days too!

Here is the 6 month version of it! I am SO excited! So much so that I am willing to send YOU a free copy just for reading my blog!! I will offer this until Jan 31, 2012 or until 20 people respond - whichever comes first... Just leave your email in a comment or contact me via the contact tab on facebook! Don't forget to mention that you read about the FREE offer on the blog!
<3
Thanks for always reading my blah blah blah!
Teri
Subscribe to:
Posts (Atom)